Posted by Aimee | Posted in Plantings | Posted on 21-05-2009
Quest completed! You have attained gardening level 3! Woot! Is what I have to say to all that. I have been quite nervous about making the sweet potato bed. I have never grown sweet potatoes before, especially since back home in Missouri it was a tad cold for growing sweet potatoes, of course over the last decade or so they have come out with newer more cold hardy varieties.

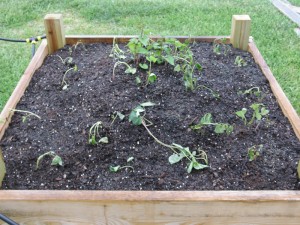
Left half is beauregard and right half is O'henry
Also, sweet potatoes are very healthy for you and they like to grow in the heat which makes them ideal for the Houston, Texas area. With sweet potatoes there are no seeds to plant, instead you plant rooted cuttings. These are very easy to make too, all you need to do is get a good looking sweet potato and put it in a flat or shallow pan half filled with damp sand, keep the sand damp, do not let it dry out. Or if need be you can just keep the flat half filled with water, however you may not get as many shoots this way. The important thing is to keep them warm, perhaps on top of the refrigerator. Once the shoots are 2-3 inches tall break them off at their base away from the potato and place them in a vase where the base is in the water and the leaves are above water. In a few days they should start to root.
After your cuttings have rooted it is time to plant them in the garden, the best method is to plant them into a generously deep raised bed, with organic time released fertilizer mixed in. Plant 9-10 inches apart and provide something for the vines to grow up if you can. The vines will root if they get a chance left against the soil. Now that I have started mine and they are planted let’s see how they do. I will be sure to update on them this fall. I am only doing 16 square feet of them. To start with I built a 4ft X 4ft bed of untreated lumber and covered the roughed up sod with newspaper. Then I dumped a 55 gallon drum of homemade compost into the bottom and covered it with peat moss and top soil mixed up and applied MicroLife fertilizer mounding the dirt up in the middle to give the plants even more room to grow. Once established plants are drought hardy, these are plants you do not want to over water. Sweet potatoes will continue to grow until overnight temperatures reach about the fifties. I will be mulching and installing some trellising for the vines tomorrow.
If I find any more pertinent information for other first time growers out there I will update that as well as my personal experience with the plant. I am still nervous even after having researched these fellows extensively just because it is a plant that I have never grown before and unlike most fruiting vegetables you cannot see the products of your labor you just have to sort of trust that they are under there. Just like my beloved Irish potatoes, you just have to trust that the beautiful plant that is growing has equally yummy tubers forming down there under the dirt. So for me getting the bed built and filled and planted was overcoming a huge hurdle of my own doubt. I could almost swear I heard the level up ding playing! =D I think that is a feeling a lot of us are coming up against, for the first time gardening isn’t just a hobby for us, but our families may depend on our productivity for sustenance. The booming of the recession garden is all over in the news as well as talks of victory gardens and for so many of us the pressure is on to make a lot out of very little. Have faith though, we can do it. We may stumble and have much learning to do but we will find our way in the end. I will have more on producing a lot of vegetables (loot) for very little cost soon.
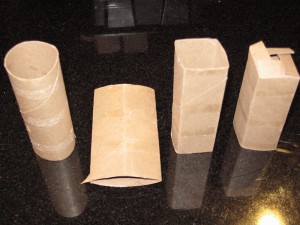
It is by no means a new idea to use toilet paper rolls to start seedlings in, but it is definitely an idea worth sharing. The toilet paper rolls are a byproduct of household life and if folded flat store quite neatly in a quart sized storage baggie pinned up inside the bathroom cabinet. Then when you are ready to plant your seedlings you get those toilet paper rolls out and follow the simple steps below. This first picture follows steps one through four, left to right.

Steps 1-4 starting at the left
- Start with a empty toilet paper roll, having a few bits of toilet paper clinging to the roll won’t hurt it in the slightest, the only reason to remove those bits is if they annoy you.
- Fold the toilet paper roll flat; just squash it with your hand onto the counter. Then center the newly made crease and fold it flat again. Doing this will make the roll into a square form.
- Now open your roll up, it should be nice and square at this point. At the bottom of one side cut a half inch slit at each corner. Then fold those slits outward and crease them.
- Now starting with whichever flap you chose fold each flap in going clockwise, when you get to the last flap tuck the end under the first flap. Just like when you close up a cardboard box.
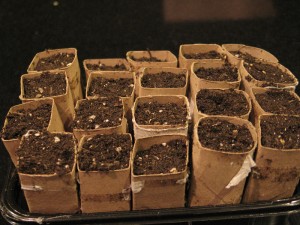
- Now, I find it is easier to put them all into a tray packed tightly and fill them with dirt all at once. Now that they are filled with dirt and ready to go just plant your seeds in and water like normal.
- When it is time to transfer to a bigger pot or outside into the ground your pot can be planted with the plant. I would just advise opening the bottom up with a gentle tug an inch or so above the plants new resting place so roots can get through even easier. (Though some roots may have already grown through the sides of the pot by now) Also make sure that the top of the cardboard is completely covered with dirt. Just to make sure the cardboard cannot wick away any moisture.

Filled and ready to go
The cardboard will finish degrading in the soil. Well done on recycling! Every little bit done by each of us to reuse and recycle helps. Don’t let anyone tell you one person’s contribution or lack thereof makes no difference because it does make a difference. I also wanted to note that the idea to cut the bottoms and make flaps to fold in for a solid base came from a member: Joeysplanting of Myfolia. These can be made without this step and shoving them together tightly into a tray certainly helps with this but I have made mine with the bottoms ever since I saw the idea and I just love it so my thanks go out to them.
Another tip, to keep track of what is planted in each pot use non-toxic markers to mark right on the rolls what you planted in them. I also like to add the date to keep track of also.
Posted by Aimee | Posted in Supplies | Posted on 11-05-2009
One of the things I want to do is write down the resources I find most helpful to me. One of the things I do most with my free time other than game is read books. Some of them stand out and as I fished for my copy of “The Bountiful Container” by Rose Marie Nichols McGee & Maggie Stuckey, I realized I had come to rely on this book a great deal.
The core of the book is to learn to be able to garden out of anything, even old milk jugs or old butter bowls. They take you step by step through the information needed to succeed as well as recommend space saving varieties and they highlight each species individually. There are themed gardens throughout and it is very easy to read straight through or to skip around and read what interests you most.
They even bring edibles together for beautiful displays and every single thing I have tried from their book has worked marvelously. I even often use it as a reference for my in the ground gardens too. Also, they cover a wide variety of things I never would have even heard of without them. Things like the saffron crocus, or delightful pineapple sage.
Beginner or veteran, I recommend to you this book. Of every gardening book I have read to date, and that is a lot of books, I have never found one as complete as this one. I urge you to check your local library or gardening buddies to find a copy to flip through.
One last thing to keep in mind, they do garden in the north so keep your local planting dates in mind. They show you how to grow just about anything in a container so if all you have room for is a window box, you can still enjoy fresh produce and they explain how to make it eye appealing as well.
Posted by Aimee | Posted in Guides, Raised Beds | Posted on 22-04-2009
Previously, I mentioned how appropriate I felt raised garden beds are for the Houston area. What I did not talk about was how easy it is to make a raised bed even without framing materials. The edges may not look as neat but the cost is very low. You will only need a couple of things before you can get started. First you will need a lot of newspaper. If you do not have easy access to this, you can ask your neighbors for theirs when they are done with it or get the grocery circulars when they go out of date, or even just save the grocery circulars for a couple of months. Also you will need bags of peat moss, compost, garden soil, fertilizer is preferred and seeds or transplants to go into your ready garden.
The soil mixture does not have to be an exact 1-1-1 ratio, you can mix it up a bit just remember that it is very important to have a lot of organic matter in the soil. The organic matter in the materials I suggested comes from the peat moss and compost. If you have compost from your home this is even better. You can space this project out over a couple of days or even weeks if you want to, just make sure that if you have exposed loose soil you keep it moistened to help it not fly away.
The first thing you will want to do is take a hose or piece of yarn and mark off where you would like your garden bed to lay. You can make it any shape you want, so long as you can reach to all the spots in the middle. It is a good idea to take a look at your shape from many angles and think if for any reason the shape or location needs altered. Is the garden bed going to be in a high traffic area? Is there room for the mower to get around it easily? Is there convenient access to water? Will the vegetables or flowers get enough sun? Any thing else the garden might be in the way of?
The nice thing about this method is that there is nothing you need to do to prepare the soil. The whole raised garden bed is going to go right on top of the newspaper, which will be covering the current grass or soil to act as a weed barrier. Once you are sure that the garden bed is exactly where you want it lay out newspaper within the borders, cut the papers to fit neatly and make sure the whole area is at least ten sheets thick. Then, wet the newspaper lightly to keep it from taking flight. Now you can remove your border marker. Then the soil materials go on in layers on top of the newspaper, each layer about two inches or so thick, the order is not overly important just add in some organic slow release fertilizer with each level. Make sure to use the recommended fertilization rates, just divide it by the set of layers you plan to have, so half as much for two sets of layers or one third as much for three sets of layers. I do suggest having the top layer be top soil. After a while though it will all get mixed together so this part doesn’t really matter it is mostly because the garden soil will look best on top. You do want to slant inward slightly from the base to the top. That way your bed will not spill over the borders you have set.
Mist the soil carefully at first and then plant your seeds and/or transplants. All you need to do is scoop out a little soil where the transplants or seeds are going and then back fill. Then water the bed more thoroughly. Congratulations you now have one very nice, very easy, low cost raised garden bed. If later on you want to dress the beds up a bit, you could just get some cheap landscaping stones and surround it.


