Evil Plant Eating Mobs

0

Posted by Aimee | Posted in Compost, Experiments, Insects | Posted on 30-04-2009

Tags: , , , ,

The weather here lately in the Houston area has been downright sopping wet. As I am sure many of you heard or saw large areas of Houston were flooded Tuesday, so much so I did not even get into work until 9:30A.M. I was fortunate enough to not have to sit in traffic, rather we waited to go to work until after the roadways had been cleared.

With all this water I was a little worried about my plants. My fancy, high tech shade providing devices (card board boxes) got so soggy they fell over on-top of the plants they were intended to protect and started squashing them. I braved the weather for just long enough to pull the boxes out of my raised garden beds and dart back indoors.

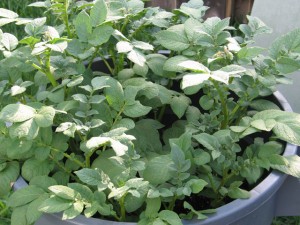
Potatoes Growing Crazy

Potatoes Growing Crazy

I am extremely glad to report that after a good once over this evening I am sure my plants are all doing well. Especially the potatoes! The only thing not intentionally planted is doing the best, though I attribute a lot of this to the fact that they were planted straight into compost and I have applied Micro-Life fertilizer to them and since all the rain and warm weather will not wash the nitrogen out and burn the plants like it can with non-organic fertilizers they are doing fantastic. They are a beautiful deep green and other than having to pick a couple of unidentified caterpillars off of them they are doing amazing, growing faster than any weed I have ever seen even.

About those caterpillars though, I should have taken a picture because the only picture I found that matched how they looked exactly labels it as an army caterpillar but by looking up pictures of army caterpillars I am rather unconvinced that is a correct identification. The caterpillar was velvety smooth looking and was black with two vivid, thin yellow stripes on its upper sides, almost so high they would be on its back. I may go out with a flashlight and see if I can find any more of these. Then I will get a picture put up and maybe one of you other Houston area gardeners can identify him for me.

I most certainly cannot have them eating those beautiful potato plants or my tomato plants either. I had read that potatoes were rather hard to grow in this area just like asparagus and peaches. I was worried enough about how well they would grow I almost just turned them under, now I am exceedingly glad I let them stay. Who knows if I will get any potatoes or not but the plants themselves look absolutely gorgeous! Here’s hoping there won’t be any more flooding!

Raised Garden Bed, No Borders

0

Posted by Aimee | Posted in Guides, Raised Beds | Posted on 22-04-2009

Tags: , , , ,

Previously, I mentioned how appropriate I felt raised garden beds are for the Houston area. What I did not talk about was how easy it is to make a raised bed even without framing materials. The edges may not look as neat but the cost is very low. You will only need a couple of things before you can get started. First you will need a lot of newspaper. If you do not have easy access to this, you can ask your neighbors for theirs when they are done with it or get the grocery circulars when they go out of date, or even just save the grocery circulars for a couple of months. Also you will need bags of peat moss, compost, garden soil, fertilizer is preferred and seeds or transplants to go into your ready garden.

The soil mixture does not have to be an exact 1-1-1 ratio, you can mix it up a bit just remember that it is very important to have a lot of organic matter in the soil. The organic matter in the materials I suggested comes from the peat moss and compost. If you have compost from your home this is even better. You can space this project out over a couple of days or even weeks if you want to, just make sure that if you have exposed loose soil you keep it moistened to help it not fly away.

The first thing you will want to do is take a hose or piece of yarn and mark off where you would like your garden bed to lay. You can make it any shape you want, so long as you can reach to all the spots in the middle. It is a good idea to take a look at your shape from many angles and think if for any reason the shape or location needs altered. Is the garden bed going to be in a high traffic area? Is there room for the mower to get around it easily? Is there convenient access to water? Will the vegetables or flowers get enough sun? Any thing else the garden might be in the way of?

The nice thing about this method is that there is nothing you need to do to prepare the soil. The whole raised garden bed is going to go right on top of the newspaper, which will be covering the current grass or soil to act as a weed barrier. Once you are sure that the garden bed is exactly where you want it lay out newspaper within the borders, cut the papers to fit neatly and make sure the whole area is at least ten sheets thick. Then, wet the newspaper lightly to keep it from taking flight. Now you can remove your border marker. Then the soil materials go on in layers on top of the newspaper, each layer about two inches or so thick, the order is not overly important just add in some organic slow release fertilizer with each level. Make sure to use the recommended fertilization rates, just divide it by the set of layers you plan to have, so half as much for two sets of layers or one third as much for three sets of layers. I do suggest having the top layer be top soil. After a while though it will all get mixed together so this part doesn’t really matter it is mostly because the garden soil will look best on top. You do want to slant inward slightly from the base to the top. That way your bed will not spill over the borders you have set.

Mist the soil carefully at first and then plant your seeds and/or transplants. All you need to do is scoop out a little soil where the transplants or seeds are going and then back fill. Then water the bed more thoroughly. Congratulations you now have one very nice, very easy, low cost raised garden bed. If later on you want to dress the beds up a bit, you could just get some cheap landscaping stones and surround it.

Composting, a Simple First Step

0

Posted by Aimee | Posted in Compost | Posted on 16-04-2009

Tags: , , , , ,

A lot of the vegetables I want to grow are heavy feeders, potatoes for example. So even with tax season looming ahead of me I started composting. It is a fantastic, easy first step towards getting a garden going, and does not require any real sort of time investment. Otherwise, all those kitchen scraps and shrub clippings go to waste. Often into a landfill where they do little more than attract unwanted bugs.

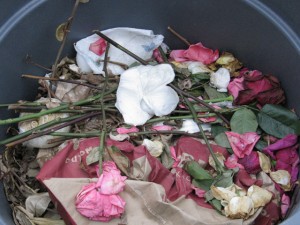
Recent Compost

Recent Compost

There are a lot of ways to handle composting and as long as you do it right it will not smell. Ants can be attracted to compost, so you may want to keep an eye on that. As long as the ants do not bother you, they are beneficial to the compost by aerating it. If you happen to have an unused corner of your yard you can turn it into a compost pile, or you can use bins or containers of your own making and there is a plethora of bins available at places like home depot or online. A couple examples include Tumbleweed Composter, Mantis Twin Composting Bin or Earthmaker Aerobic Composter – 120 Gallon.

To start out with, think about how quickly you want your compost ready and how much effort you are willing to put into it. If you just take your kitchen scraps and yard cuttings and toss them in a pile they will over time break down. Keeping it covered lightly with soil will help to keep insect numbers down somewhat and to prevent foul odors. This method is the slowest and least efficient method and also requires almost no work. The micro-organisms will eventually break down the material and you will get compost. This type of compost will consistently be at the bottom of the pile.

To speed things up a bit add a bit of air and keep your compost pile moist (not soaked). Adding air is as easy as turning the compost regularly, a lot of retail bins make that as easy as turning a handle. In our case we put the trash can lid on and roll the bin around the yard. It also helps to keep greens and browns about equal. Browns are things like sawdust, hay, leaves, wood chips or branches. Greens are lawn clippings, fruits and vegetables.

You can also help the process by not trying to compost meat, dairy or fat. These ingredients in small dosages are ok, but can attract dogs, cats or even raccoons. If you are looking to make a small first step towards starting a garden, composting is your best option. It requires no money to start and it can create the richest soil available for your fruits, vegetables, flower and plants. Many plants would thrive without the need for any fertilizer at all if grown in pure compost. So far I have been thrilled with what compost we have created, I have even taken dead roses and flowers home from ladies at the office and tossed them into the compost. Compost is the present that just keeps on giving, as you add compost to your soil it will improve the soil structure overall and provide your plants with nutrients. Compostable materials are estimated to be approximately 30% of household wastes. Also commercially available compost may not be of a high quality. Often saw dust or wood chips are used as filler, these can actually tie up nutrients plants need if in large enough quantities.

A basic list of what is not compostable is:

  • Meat, dairy and fatty wastes
  • Diseased plants or problem weeds
  • Human or pet wastes
  • Anything that may contain chemicals or has been chemically treated

When I get more time I will compile a complete guide to composting.

An excellent source of more information is: http://www.vegweb.com/composting