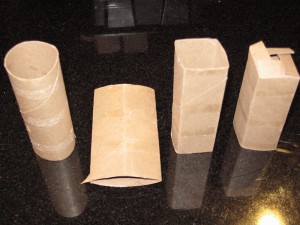
It is by no means a new idea to use toilet paper rolls to start seedlings in, but it is definitely an idea worth sharing. The toilet paper rolls are a byproduct of household life and if folded flat store quite neatly in a quart sized storage baggie pinned up inside the bathroom cabinet. Then when you are ready to plant your seedlings you get those toilet paper rolls out and follow the simple steps below. This first picture follows steps one through four, left to right.

Steps 1-4 starting at the left
- Start with a empty toilet paper roll, having a few bits of toilet paper clinging to the roll won’t hurt it in the slightest, the only reason to remove those bits is if they annoy you.
- Fold the toilet paper roll flat; just squash it with your hand onto the counter. Then center the newly made crease and fold it flat again. Doing this will make the roll into a square form.
- Now open your roll up, it should be nice and square at this point. At the bottom of one side cut a half inch slit at each corner. Then fold those slits outward and crease them.
- Now starting with whichever flap you chose fold each flap in going clockwise, when you get to the last flap tuck the end under the first flap. Just like when you close up a cardboard box.
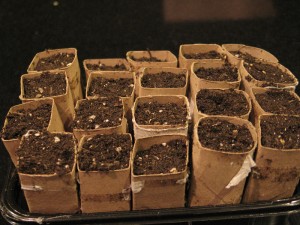
- Now, I find it is easier to put them all into a tray packed tightly and fill them with dirt all at once. Now that they are filled with dirt and ready to go just plant your seeds in and water like normal.
- When it is time to transfer to a bigger pot or outside into the ground your pot can be planted with the plant. I would just advise opening the bottom up with a gentle tug an inch or so above the plants new resting place so roots can get through even easier. (Though some roots may have already grown through the sides of the pot by now) Also make sure that the top of the cardboard is completely covered with dirt. Just to make sure the cardboard cannot wick away any moisture.

Filled and ready to go
The cardboard will finish degrading in the soil. Well done on recycling! Every little bit done by each of us to reuse and recycle helps. Don’t let anyone tell you one person’s contribution or lack thereof makes no difference because it does make a difference. I also wanted to note that the idea to cut the bottoms and make flaps to fold in for a solid base came from a member: Joeysplanting of Myfolia. These can be made without this step and shoving them together tightly into a tray certainly helps with this but I have made mine with the bottoms ever since I saw the idea and I just love it so my thanks go out to them.
Another tip, to keep track of what is planted in each pot use non-toxic markers to mark right on the rolls what you planted in them. I also like to add the date to keep track of also.
Posted by Aimee | Posted in Compost, Experiments, Insects | Posted on 30-04-2009
The weather here lately in the Houston area has been downright sopping wet. As I am sure many of you heard or saw large areas of Houston were flooded Tuesday, so much so I did not even get into work until 9:30A.M. I was fortunate enough to not have to sit in traffic, rather we waited to go to work until after the roadways had been cleared.
With all this water I was a little worried about my plants. My fancy, high tech shade providing devices (card board boxes) got so soggy they fell over on-top of the plants they were intended to protect and started squashing them. I braved the weather for just long enough to pull the boxes out of my raised garden beds and dart back indoors.

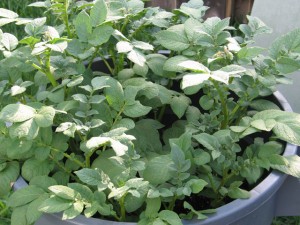
Potatoes Growing Crazy
I am extremely glad to report that after a good once over this evening I am sure my plants are all doing well. Especially the potatoes! The only thing not intentionally planted is doing the best, though I attribute a lot of this to the fact that they were planted straight into compost and I have applied Micro-Life fertilizer to them and since all the rain and warm weather will not wash the nitrogen out and burn the plants like it can with non-organic fertilizers they are doing fantastic. They are a beautiful deep green and other than having to pick a couple of unidentified caterpillars off of them they are doing amazing, growing faster than any weed I have ever seen even.
About those caterpillars though, I should have taken a picture because the only picture I found that matched how they looked exactly labels it as an army caterpillar but by looking up pictures of army caterpillars I am rather unconvinced that is a correct identification. The caterpillar was velvety smooth looking and was black with two vivid, thin yellow stripes on its upper sides, almost so high they would be on its back. I may go out with a flashlight and see if I can find any more of these. Then I will get a picture put up and maybe one of you other Houston area gardeners can identify him for me.
I most certainly cannot have them eating those beautiful potato plants or my tomato plants either. I had read that potatoes were rather hard to grow in this area just like asparagus and peaches. I was worried enough about how well they would grow I almost just turned them under, now I am exceedingly glad I let them stay. Who knows if I will get any potatoes or not but the plants themselves look absolutely gorgeous! Here’s hoping there won’t be any more flooding!
The soaker hose irrigation I decided to install in my garden is giving me some problems. Even though we have tried two different pressure regulators it seems the pressure is still too high. We have large streams of water spurting from the hose going off in whatever direction they feel like, often landing on the yard and not putting the water where I need it, in my garden. As a result some plants are not getting any water at all.
I went ahead and paid out extra for the nicer brass water pressure regulator. We just could not get it to work right, but that was during tax season and we were trying to set up the system in the dark holding flashlights to see so we grabbed the cheaper, non-adjustable plastic version and threw it on. The important thing was that we start getting some water to the plants since we were unable to take the time to water them. Now, in these last two weeks we have received more than enough rain so I have been putting off the task of fixing the irrigation system. After doing some research online though it looks like an underground irrigation system would have been a better idea.
I have to point out though that the underground irrigation system I have been looking at may require a lot more talent than I have to install. It seems though that the extra set-up time and cost would be worth it in the long run. An underground system loses almost no water to evaporation, where as the soaker hose will lose a fair amount of moisture to evaporation on hot, sunny, or windy days. Before making any final judgments though I think I am going to try the underground irrigation system on the next couple of garden beds and compare with the results from the first couple planting beds which currently have the soaker hose system. This is all assuming I can get them both set-up and working properly. Once I have some results I will post a follow up to this. Also any suggestions on better irrigation would be more than welcome.


