A soil mix that both your plants and the undead can enjoy!

0

Posted by Aimee | Posted in Compost, Raised Beds, Soil | Posted on 01-12-2010

Tags: , , , , , , , , , , , , , , ,

One of the most important things to do when starting your plants is to make sure that the soil they will be raised in is as good as you can make it. This often means making amendments to the soil or creating a soilless mix for the plants to grow in.

Having a good soil for your plant can often double or triple your harvest and often means the difference between a plant thriving or dying. For my plants I start with the same base every time, then expand to their specific needs. If it is going to be in my garden beds, I mix the soilless mixture in equal parts with my present soil, optimally to a depth of 12 inches.

I cannot claim full credit for my soilless recipe as it got it’s start by reading various garden books and trying different combinations. The one I chose ended up being very close to the one Mel Barthalowmew uses in his “Square Foot Gardening” series.

The key components to this mix are as follows: Coarse grade vermiculite, peat moss, compost, composted chicken manure, MicroLife fertilizer, soil moist, kelp meal, fish meal, and worm castings. These soil amendments combined make an absolutely fantastic soil. If you cannot get all of these ingredients you can still have good soil but each amendment has key benefits that I will go into further detail in our next post.

The recipe itself is pretty easy, I use an old, clean, five gallon bucket as a measure. An old gallon milk jug with the top cut off works pretty well too. Mixing the ingredients on a tarp works well if you have someone to help you mix. Otherwise in a wheelbarrow with a shovel is your next best option. You can enlarge or shrink your batch as you desire just keep the soil amendments in the same proportions. First measure out 1 bucket of each: vermiculite, peat moss, & compost.

The other soil amendments are more expensive and so I usually have less of a supply of them but you cannot have too much of the chicken manure or worm castings so that is what you want the bulk of it to be. Next, fill your bucket half full or more of composted chicken manure, Then add your worm castings to the bucket leaving about 1 gallon of space left (Total composted chicken manure and worm castings of 4 gallons.)add 1 cup of Microlife, 1 cup of soil moist, and then split the remaining room between the ground sea kelp and fish meal. Add this last bucket full to your pile of vermiculite, peat moss, & compost.

Mix the pile together thoroughly and then use as is for potted plants or raised beds or mix in equal parts with your soil. If your soil is very, very sandy, I recommend the addition of more compost (another bucket full). If your soil is mostly clay I suggest the addition of a bucket full of green sand (agricultural sand.)

This base has proved to me to be an excellent choice both indoors and out, my plants have thrived and I only add more compost and Microlife on occasion. You can also tailor this mix to your specific plants likes. Please feel free to contact me with any questions you may have.

Raised Garden Bed, No Borders

0

Posted by Aimee | Posted in Guides, Raised Beds | Posted on 22-04-2009

Tags: , , , ,

Previously, I mentioned how appropriate I felt raised garden beds are for the Houston area. What I did not talk about was how easy it is to make a raised bed even without framing materials. The edges may not look as neat but the cost is very low. You will only need a couple of things before you can get started. First you will need a lot of newspaper. If you do not have easy access to this, you can ask your neighbors for theirs when they are done with it or get the grocery circulars when they go out of date, or even just save the grocery circulars for a couple of months. Also you will need bags of peat moss, compost, garden soil, fertilizer is preferred and seeds or transplants to go into your ready garden.

The soil mixture does not have to be an exact 1-1-1 ratio, you can mix it up a bit just remember that it is very important to have a lot of organic matter in the soil. The organic matter in the materials I suggested comes from the peat moss and compost. If you have compost from your home this is even better. You can space this project out over a couple of days or even weeks if you want to, just make sure that if you have exposed loose soil you keep it moistened to help it not fly away.

The first thing you will want to do is take a hose or piece of yarn and mark off where you would like your garden bed to lay. You can make it any shape you want, so long as you can reach to all the spots in the middle. It is a good idea to take a look at your shape from many angles and think if for any reason the shape or location needs altered. Is the garden bed going to be in a high traffic area? Is there room for the mower to get around it easily? Is there convenient access to water? Will the vegetables or flowers get enough sun? Any thing else the garden might be in the way of?

The nice thing about this method is that there is nothing you need to do to prepare the soil. The whole raised garden bed is going to go right on top of the newspaper, which will be covering the current grass or soil to act as a weed barrier. Once you are sure that the garden bed is exactly where you want it lay out newspaper within the borders, cut the papers to fit neatly and make sure the whole area is at least ten sheets thick. Then, wet the newspaper lightly to keep it from taking flight. Now you can remove your border marker. Then the soil materials go on in layers on top of the newspaper, each layer about two inches or so thick, the order is not overly important just add in some organic slow release fertilizer with each level. Make sure to use the recommended fertilization rates, just divide it by the set of layers you plan to have, so half as much for two sets of layers or one third as much for three sets of layers. I do suggest having the top layer be top soil. After a while though it will all get mixed together so this part doesn’t really matter it is mostly because the garden soil will look best on top. You do want to slant inward slightly from the base to the top. That way your bed will not spill over the borders you have set.

Mist the soil carefully at first and then plant your seeds and/or transplants. All you need to do is scoop out a little soil where the transplants or seeds are going and then back fill. Then water the bed more thoroughly. Congratulations you now have one very nice, very easy, low cost raised garden bed. If later on you want to dress the beds up a bit, you could just get some cheap landscaping stones and surround it.

The Raised Bed Instance

0

Posted by Aimee | Posted in Raised Beds | Posted on 15-04-2009

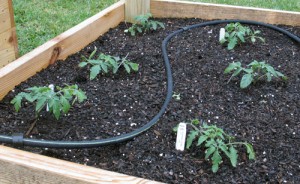
So, to start this gardening adventure I looked into soil prep. First I had planned to till up the soil and plant things into the ground, that is what we had always done growing up but then I read about the damage you do to the good soil organisms and all the additives needed to make solid clay into friable soil. After a bit of research it seemed the best option for us would be raised beds. So we made our first one out of untreated pine boards to avoid any of the chemicals used on treated wood from leaching into the soil. Though they say now that the chemicals used on the treated wood should be safe for building a garden bed, I am more of a better safe than sorry sort of person.

However you do not need to go buy lumber, there are a lot of options available for making raised beds, such as metal sheeting, scrap lumber or wood sheeting, cinder blocks or just stacked rocks if you happen to have an abundance of them on hand. For us, the pine boards seemed the most economical, since I do not trust myself to not get cut on metal sheeting, which would have been cheaper and likely more durable than the wood. After building our garden bed we roughed up the grass within the bed a bit. That experience alone attests to the exercise a person can get gardening, you could undoubtedly skip this step but I thought that it may make it easier for roots to penetrate into the clay with a bit of transitioning. In retrospect I wish I had laid down a couple layers of newspaper but there is always next time.

Fiercely Protected Tomatoes

Fiercely Protected Tomatoes

Then we filled our bed with a mixture of approximately one-third organic matter (compost and peat moss), one-third vermiculite, and one-third garden soil. It did take a bit of elbow grease to get it all well mixed, but then I got to plant my tomato plants. I was so excited I couldn’t help going to check on them a few times later in the evening. Just in case some evil tomato-stealing bandits happened past and my precious tomatoes needed my fierce protection.

I did in all of this make one major mistake that I know of, I ordered my tomato plants from a mail order catalog excited to try a couple varieties not available locally. The problem comes in that they did not ship my tomatoes to me until mid April. This sounded fine to me when I made the order but of course I am used to Missouri weather, we still get snows in April. Snow in April is not a common problem down here. I learned that it will likely get too hot for my tomatoes to produce before they reach maturity but I still have hope. It seems tomato seeds should be started indoors in early to mid January and transplants set out with protection in early to mid March. I was thinking of starting my eggplant and squash soon, I sure hope it is not too late for them. In Missouri we would have started plants indoors about now to go out in a month or so. I guess it is going to take me some time to adjust to the local Houston weather. I will see how the plants handle the summer weather, it is much warmer now than I expected.